Run a Mithril signer node
For more information about the Mithril protocol, see the About Mithril section.
Mithril signer deployment model
In this guide, you will learn how to set up a Mithril signer within the stake pool operator (SPO) infrastructure, both on Cardano mainnet and testnet environments:
- On
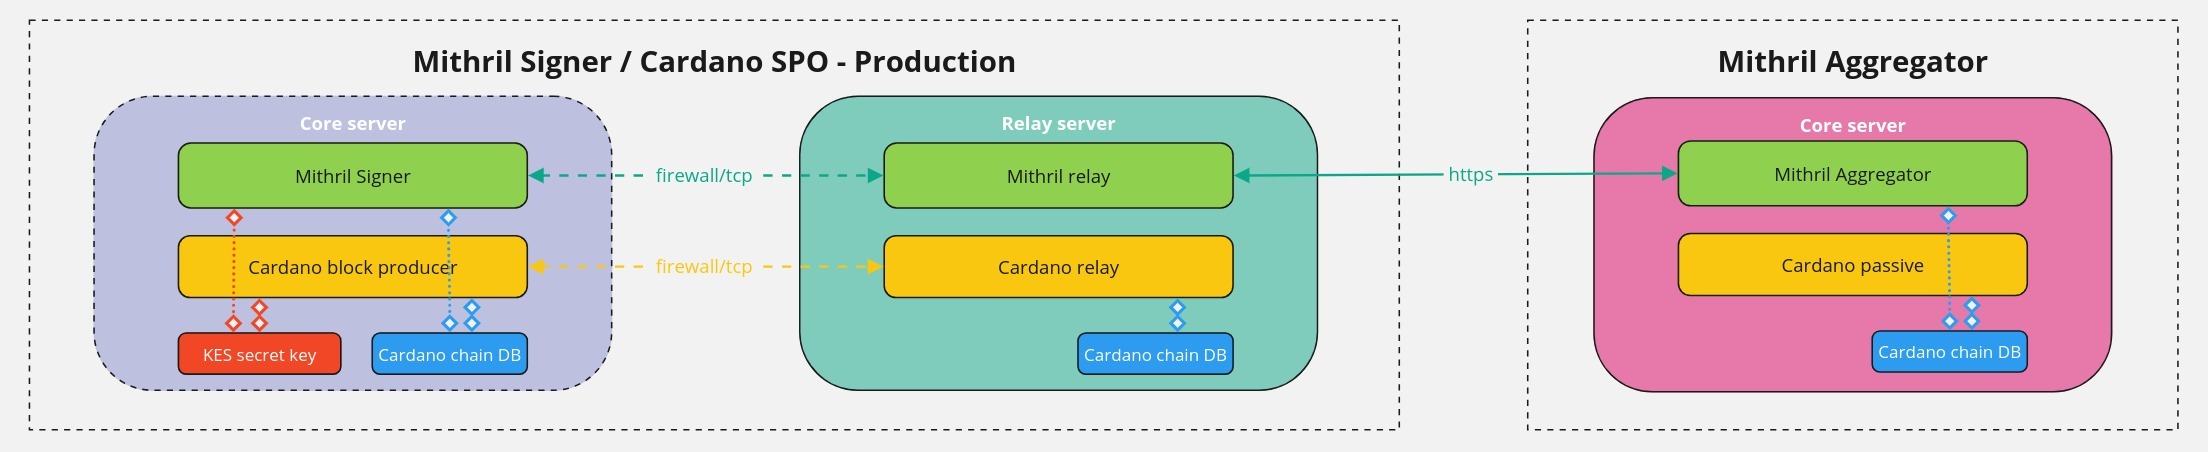
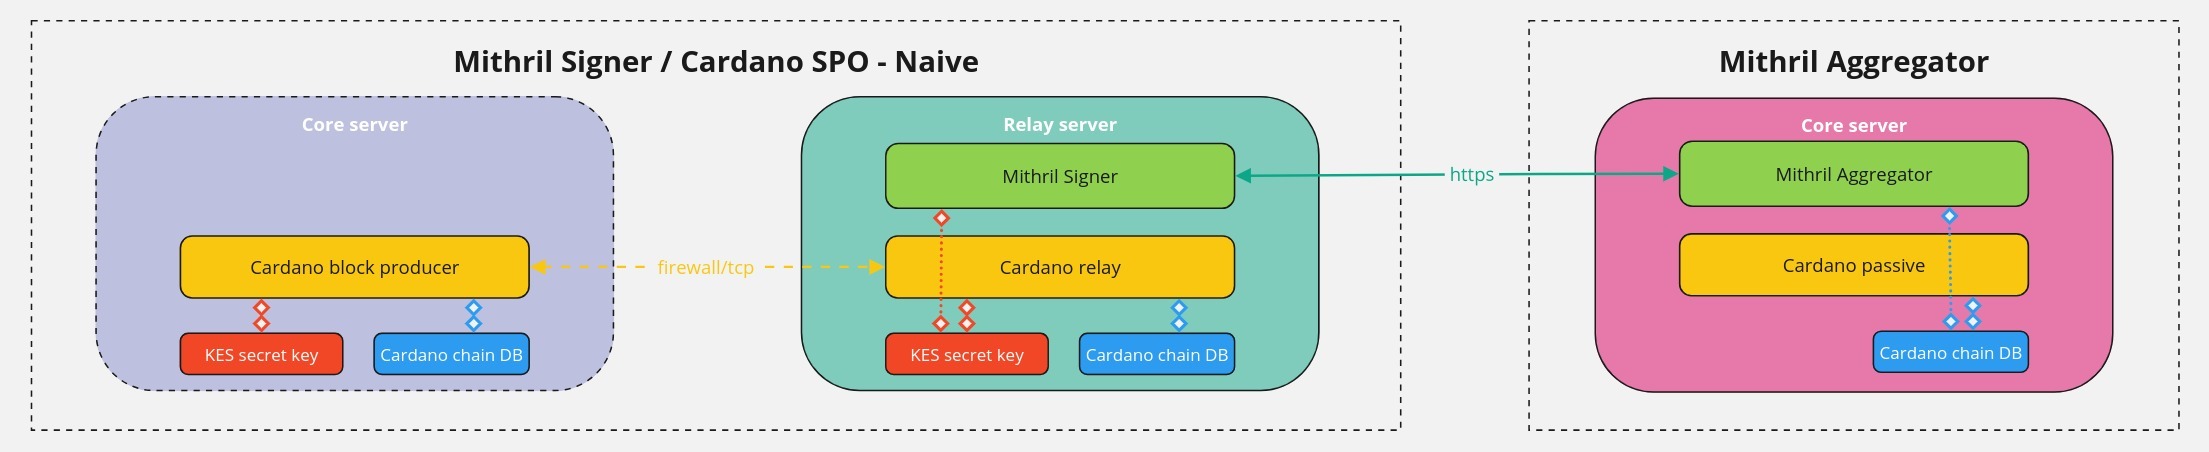
mainnet, you must run the production deployment where the Mithril signer runs on the Cardano block producer machine and the Mithril relay runs on the Cardano relay machine. Note that you can also run the production deployment ontestnet. - You can also run naive deployment, where the Mithril signer runs on the Cardano relay machine. This is possible in the testnet environment only, and does not require setting up a Mithril relay.
In the current setup, you don't need to install a Mithril aggregator.
The production deployment model is currently in beta.
Below is the schema of the production deployment on mainnet:
and the schema of the naive deployment specifically for testnets:
On mainnet, you must never copy the KES secret key from the Cardano block producer machine!
Mithril keys certification
The Mithril signer uses your Cardano operational certificate and KES secret key files, which enable:
- Automatic computation of the
PoolId - Verification of your
PoolIdownership and the associated stake used by the Mithril protocol - Verification of your Mithril
signer secret keyownership, which allows you to participate in the multi-signature process for certificate production on the Mithril network.
Mithril signer footprint
The Mithril signer has been designed to have the lowest possible footprint in terms of CPU, memory, disk I/O, and storage. Thus, there are no additional requirements for the recommended hardware to run a Cardano stake pool, as detailed in this guide.
Here are some figures about the Mithril signer node running on Cardano mainnet:
- It is idle most of the time with a very low CPU usage of less than
5% - It uses less than
200 MBof resident memory - It sends a new signature to the aggregator roughly every
10 minutesand a new registration every5 days(<1 MBper day) When launched for the first time, a pre-loading phase occurs, during which the Cardano transactions are imported with a spike of50-70%CPU on one core for~5 hours - When signing for the first time, the Cardano database digest cache needs to be built with a spike of
50-70%CPU on one core for~1 hour - Also, the full Cardano database files will be read from disk once during this cache building process
- Only stake distributions, Mithril keys, and some cache (for the Cardano database and Cardano transactions) are stored on the disk (
<200 MB).
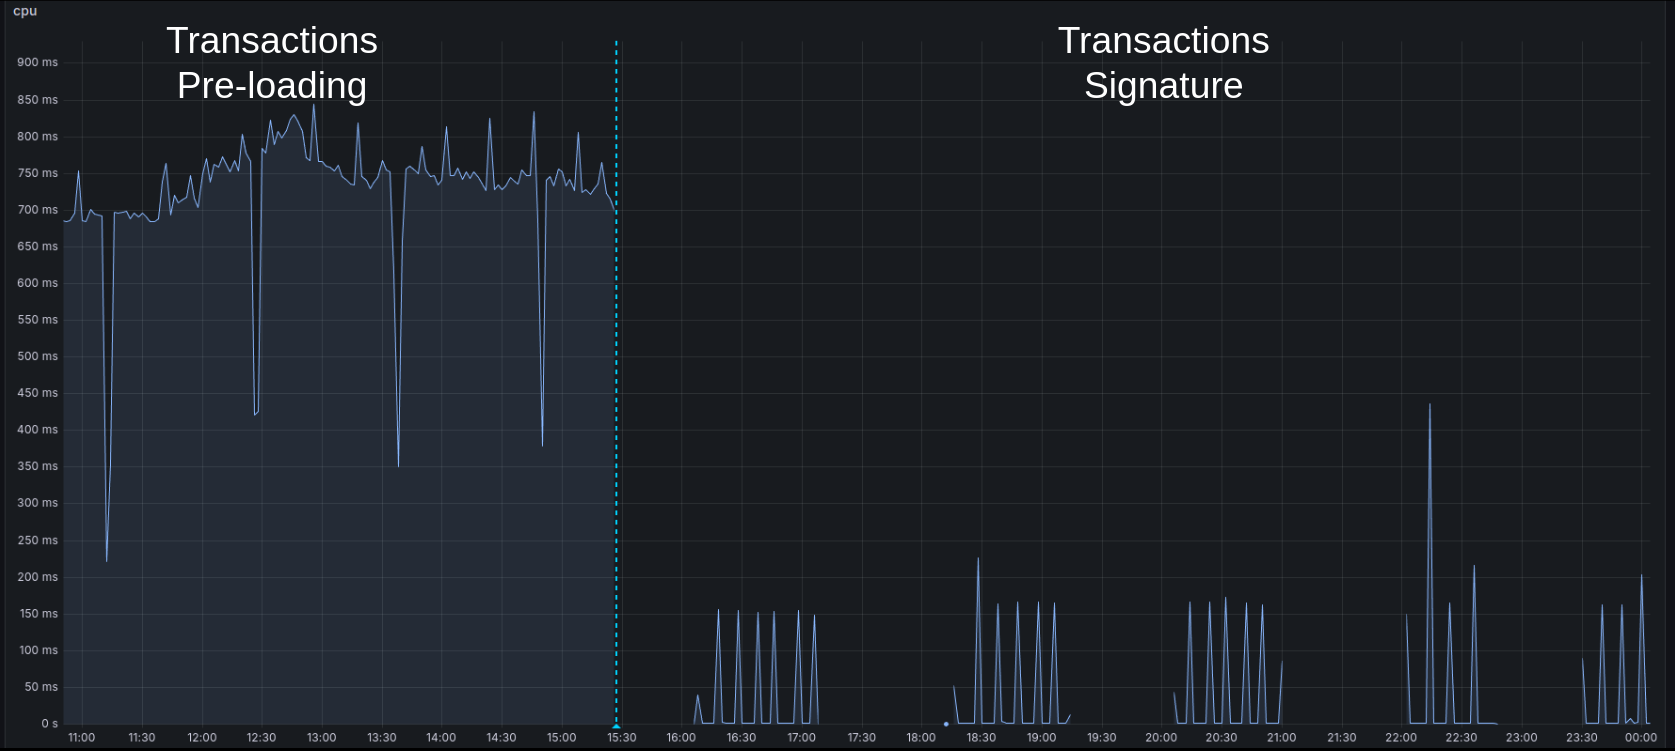
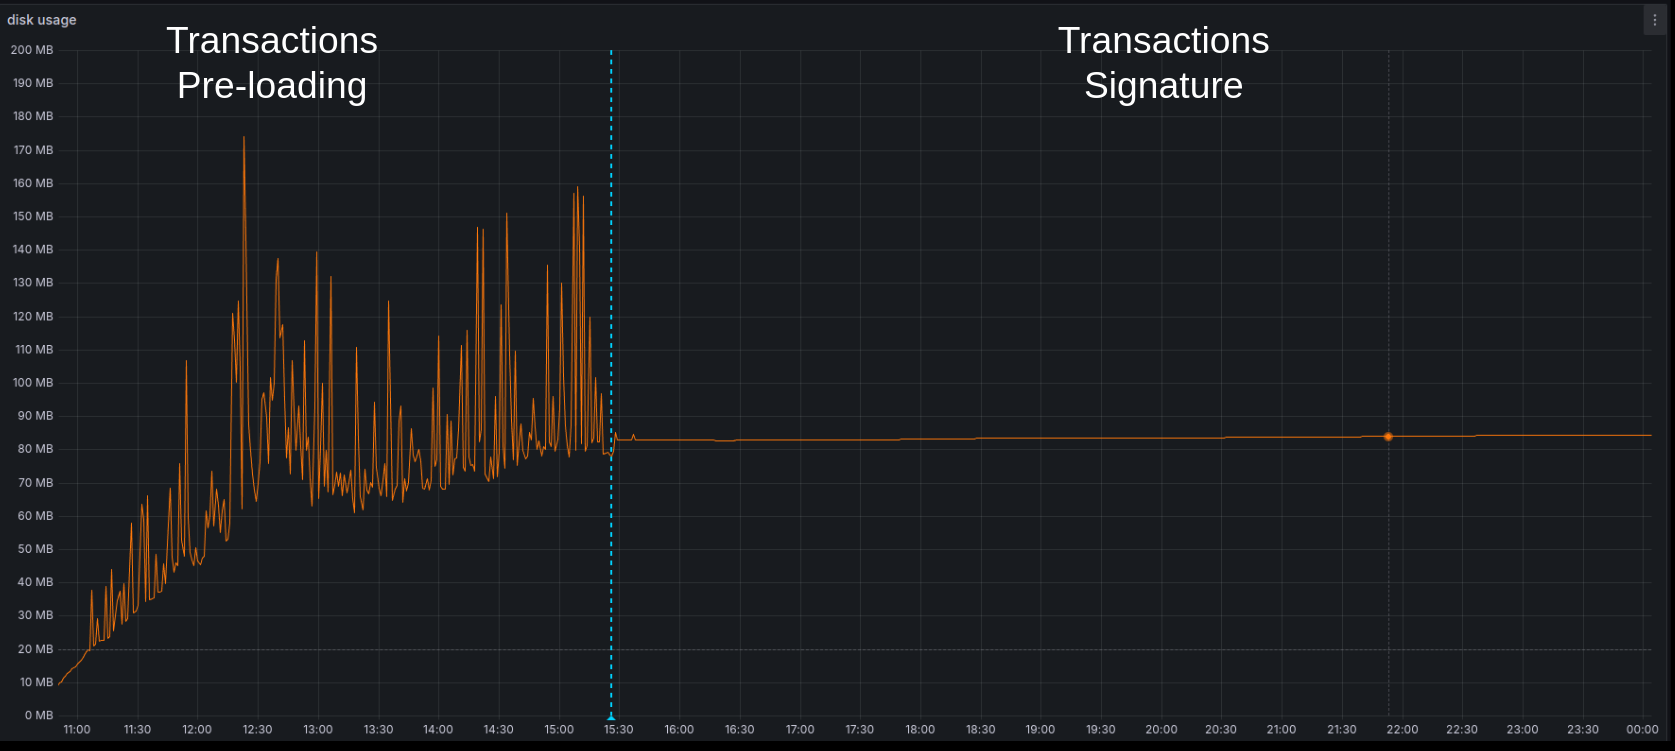
Cardano transactions certification footprint
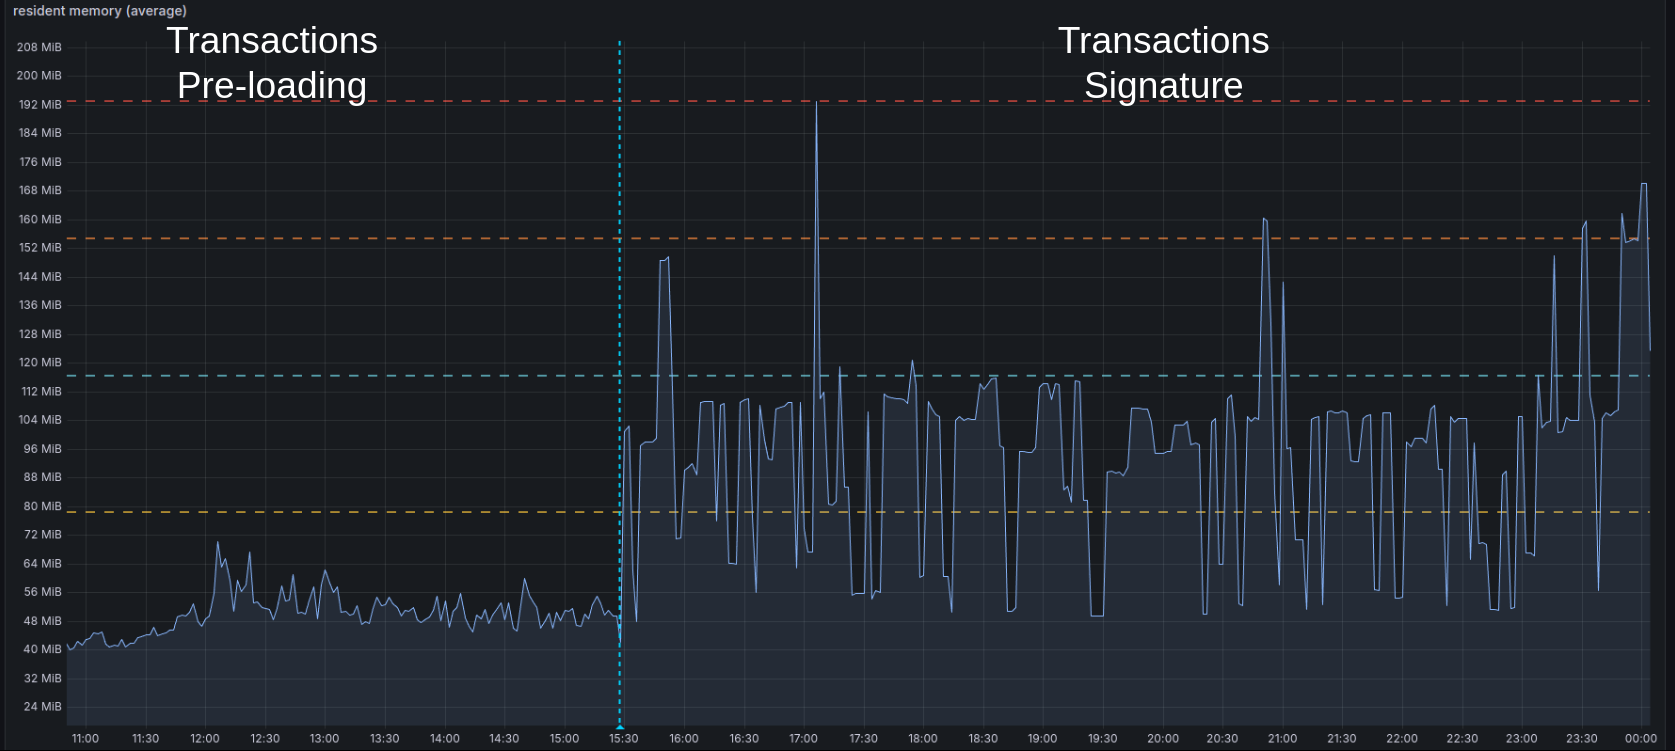
Here is a detailed view of the Cardano transaction signature's impact (the most resource-intensive part of Mithril) on the SPO infrastructure on the mainnet:
CPU
Memory
Disk
Prerequisites
Note that this guide works only on a Linux machine.
-
To operate a Cardano node as a stake pool, you need:
- The pool's
operational certificate - The pool's
KES secret key
- The pool's
-
To access the file system of the Cardano block-producing node for production deployment (or of the Cardano relay node for naive deployment), you will need the following permissions:
- Read rights on the
Databasefolder (specified by the--database-pathsetting of the Cardano node) - Read and write rights on the
Inter Process Communicationfile (typically defined by theCARDANO_NODE_SOCKET_PATHenvironment variable used to launch the Cardano node)
- Read rights on the
-
Install a recent version of
cardano-cli(version 8.9.1+) -
Install a correctly configured Rust toolchain (latest stable version); you can follow the instructions provided here
-
Install build tools
build-essentialandm4; for example, on Ubuntu/Debian/Mint, runsudo apt install build-essential m4 -
Install OpenSSL development libraries; for example, on Ubuntu/Debian/Mint, run
apt install libssl-dev -
Install a recent version of
jq(version 1.6+) by runningapt install jq -
Only for the production deployment, install a recent version of
squid-cache(version 6.12+).
Set up the Mithril signer node
-
For production deployment, the Mithril signer setup is performed on the Cardano block producer machine
-
For naive deployment, the Mithril signer setup is performed on the Cardano relay machine.
Compare the version of your Cardano node with the minimum supported versions listed in the networks.json file to verify its compatibility with the Mithril signer.
First, check the version of your Cardano node by running the following command:
cardano-node --version
Then, refer to the minimum supported versions listed in the networks.json file.
You can also fetch the minimum supported version for your network using the command below:
wget -q -O - https://raw.githubusercontent.com/input-output-hk/mithril/main/networks.json | jq -r '."**YOUR_CARDANO_NETWORK**"."cardano-minimum-version"."mithril-signer"'
Here is an example for preprod:
wget -q -O - https://raw.githubusercontent.com/input-output-hk/mithril/main/networks.json | jq -r '."preprod"."cardano-minimum-version"."mithril-signer"'
Building your own executable
Download the source file
To download the source from GitHub (HTTPS), run:
git clone https://github.com/input-output-hk/mithril.git
Or (SSH):
git clone git@github.com:input-output-hk/mithril.git
Build the Mithril signer binary
First, switch to build a branch/tag:
# **YOUR_BUILD_BRANCH_OR_TAG** depends on the Mithril network you target,
# please refer to the **Build from** column of the **Mithril networks** section
git checkout **YOUR_BUILD_BRANCH_OR_TAG**
Then, change the directory:
cd mithril/mithril-signer
Run tests (optional):
make test
Finally, build the executable:
make build
Download the pre-built binary
You can install a the latest released binary of the mithril-signer by running this one line command (replace YOUR_PATH with your installation path):
curl --proto '=https' --tlsv1.2 -sSf
https://raw.githubusercontent.com/input-output-hk/mithril/refs/heads/main/mithril-install.sh
| sh -s -- -c mithril-signer -d latest -p YOUR_PATH
You can also install the mithril-signer binary for other distributions:
- use
-d unstablefor the unstable version - use
-d **DISTRIBUTION_VERSION**for a specific distribution (e.g.-d 2445.0)
The Linux binaries target glibc, and have a minimum requirement of glibc 2.35 (compatible with Ubuntu 22.04
or Debian 12 - Bookworm).
Verifying the binary
Verify the version of the binary
You can check that the Mithril signer binary is running the correct version by running:
./mithril-signer -V
You should see something like:
mithril-signer 0.2.0
⚠️ Please verify that the displayed version matches the version described in the release/pre-release notes (refer to the Build from column in the Mithril networks section).
Verify the build
Check that the Mithril signer binary is working correctly by running the help function:
./mithril-signer -h
You should see:
An implementation of a Mithril signer

Usage: mithril-signer [OPTIONS]

Options:
  -r, --run-mode <RUN_MODE>
          Run Mode [env: RUN_MODE=] [default: dev]
  -v, --verbose...
          Verbosity level, add more v to increase
  -c, --configuration-dir <CONFIGURATION_DIR>
          Directory where the configuration file is located [default: ./config]
      --disable-digests-cache
          Disable immutables digests cache
      --reset-digests-cache
          If set the existing immutables digests cache will be reset
  -h, --help
          Print help information (use `--help` for more detail)
  -V, --version
          Print version information
If you wish to delve deeper, you can access logs at various levels from the Mithril signer:
- Add
-vfor some logs (WARN) - Add
-vvfor more logs (INFO) - Add
-vvvfor even more logs (DEBUG) - Add
-vvvvfor all logs (TRACE).
Installing the service
Move the executable
To move the executable to /opt/mithril, run:
sudo mkdir -p /opt/mithril
sudo mv mithril-signer /opt/mithril
Set up the service
-
User=cardano: Replace this value with the correct user. Here, we assume that the user running the Cardano node iscardano. The Mithril signer must imperatively run with the same user. -
In the
/opt/mithril/mithril-signer.envenv file:KES_SECRET_KEY_PATH=/cardano/keys/kes.skey: replace/cardano/keys/kes.skeywith the path to your CardanoKES secret keyfileOPERATIONAL_CERTIFICATE_PATH=/cardano/cert/opcert.cert: replace/cardano/cert/opcert.certwith the path to your Cardanooperational certificatefileDB_DIRECTORY=/cardano/db: replace/cardano/dbwith the path to the database folder of the Cardano node (the one in--database-path)CARDANO_NODE_SOCKET_PATH=/cardano/ipc/node.socket: replace with the path to the IPC file (CARDANO_NODE_SOCKET_PATHenv var)CARDANO_CLI_PATH=/app/bin/cardano-cli: replace with the path to thecardano-cliexecutableDATA_STORES_DIRECTORY=/opt/mithril/stores: replace with the path to a folder where the Mithril signer will store its data (eg,/opt/mithril/stores)STORE_RETENTION_LIMIT: if set, this will limit the number of records in some internal stores (5 is a good fit)ERA_READER_ADAPTER_TYPE=cardano-chain: replacecardano-chainwith the era reader adapter type used in your Mithril networkERA_READER_ADAPTER_PARAMS={"address": "...", "verification_key": "..."}: replace{"address": "...", "verification_key": "..."}with the era reader parameters that you need to compute by running the commandjq -nc --arg address $(wget -q -O - **YOUR_ERA_READER_ADDRESS**) --arg verification_key $(wget -q -O - **YOUR_ERA_READER_VERIFICATION_KEY**) '{"address": $address, "verification_key": $verification_key}'RELAY_ENDPOINT=http://192.168.1.50:3132(optional): this is the endpoint of the Mithril relay, which is required for production deployment only. For naive deployment, do not set this variable in your environment file.
Here is an example set of values for release-preprod that will be used in this guide in the tip boxes to illustrate some commands:
- YOUR_KES_SECRET_KEY_PATH:
/cardano/keys/kes.skey - YOUR_OPERATIONAL_CERTIFICATE_PATH:
/cardano/keys/node.cert - YOUR_CARDANO_NETWORK:
preprod - YOUR_AGGREGATOR_ENDPOINT:
https://aggregator.release-preprod.api.mithril.network/aggregator - YOUR_ERA_READER_ADAPTER_TYPE:
cardano-chain - YOUR_ERA_READER_ADAPTER_PARAMS:
{"address": "addr_test1qpkyv2ws0deszm67t840sdnruqgr492n80g3y96xw3p2ksk6suj5musy6w8lsg3yjd09cnpgctc2qh386rtxphxt248qr0npnx", "verification_key": "5b35352c3232382c3134342c38372c3133382c3133362c34382c382c31342c3138372c38352c3134382c39372c3233322c3235352c3232392c33382c3234342c3234372c3230342c3139382c31332c33312c3232322c32352c3136342c35322c3130322c39312c3132302c3230382c3134375d"} - YOUR_RELAY_ENDPOINT:
192.168.1.50 - YOUR_RELAY_LISTENING_PORT:
3132 - YOUR_BLOCK_PRODUCER_INTERNAL_IP:
192.168.1.75 - YOUR_SIGNER_LOGS_PATH:
/var/log/syslog - YOUR_PARTY_ID:
pool1hp72sauk0g0yqm4dzllz0pz6j93gewhllkzphn4hykkfmne43y
First, create an environment file that the service will use:
- For production deployment:
sudo bash -c 'cat > /opt/mithril/mithril-signer.env << EOF
KES_SECRET_KEY_PATH=**YOUR_KES_SECRET_KEY_PATH**
OPERATIONAL_CERTIFICATE_PATH=**YOUR_OPERATIONAL_CERTIFICATE_PATH**
NETWORK=**YOUR_CARDANO_NETWORK**
AGGREGATOR_ENDPOINT=**YOUR_AGGREGATOR_ENDPOINT**
RUN_INTERVAL=60000
DB_DIRECTORY=/cardano/db
CARDANO_NODE_SOCKET_PATH=/cardano/ipc/node.socket
CARDANO_CLI_PATH=/app/bin/cardano-cli
DATA_STORES_DIRECTORY=/opt/mithril/stores
STORE_RETENTION_LIMIT=5
ERA_READER_ADAPTER_TYPE=**YOUR_ERA_READER_ADAPTER_TYPE**
ERA_READER_ADAPTER_PARAMS=**YOUR_ERA_READER_ADAPTER_PARAMS**
RELAY_ENDPOINT=**YOUR_RELAY_ENDPOINT**
EOF'
Here is an example of the aforementioned command created with the example set for release-preprod:
sudo bash -c 'cat > /opt/mithril/mithril-signer.env << EOF
KES_SECRET_KEY_PATH=/cardano/keys/kes.skey
OPERATIONAL_CERTIFICATE_PATH=/cardano/keys/node.cert
NETWORK=preprod
AGGREGATOR_ENDPOINT=https://aggregator.release-preprod.api.mithril.network/aggregator
RUN_INTERVAL=60000
DB_DIRECTORY=/cardano/db
CARDANO_NODE_SOCKET_PATH=/cardano/ipc/node.socket
CARDANO_CLI_PATH=/app/bin/cardano-cli
DATA_STORES_DIRECTORY=/opt/mithril/stores
STORE_RETENTION_LIMIT=5
ERA_READER_ADAPTER_TYPE=cardano-chain
ERA_READER_ADAPTER_PARAMS={"address": "addr_test1qpkyv2ws0deszm67t840sdnruqgr492n80g3y96xw3p2ksk6suj5musy6w8lsg3yjd09cnpgctc2qh386rtxphxt248qr0npnx", "verification_key": "5b35352c3232382c3134342c38372c3133382c3133362c34382c382c31342c3138372c38352c3134382c39372c3233322c3235352c3232392c33382c3234342c3234372c3230342c3139382c31332c33312c3232322c32352c3136342c35322c3130322c39312c3132302c3230382c3134375d"}
RELAY_ENDPOINT=http://192.168.1.50:3132
EOF'
- For naive deployment:
sudo bash -c 'cat > /opt/mithril/mithril-signer.env << EOF
KES_SECRET_KEY_PATH=**YOUR_KES_SECRET_KEY_PATH**
OPERATIONAL_CERTIFICATE_PATH=**YOUR_OPERATIONAL_CERTIFICATE_PATH**
NETWORK=**YOUR_CARDANO_NETWORK**
AGGREGATOR_ENDPOINT=**YOUR_AGGREGATOR_ENDPOINT**
RUN_INTERVAL=60000
DB_DIRECTORY=/cardano/db
CARDANO_NODE_SOCKET_PATH=/cardano/ipc/node.socket
CARDANO_CLI_PATH=/app/bin/cardano-cli
DATA_STORES_DIRECTORY=/opt/mithril/stores
STORE_RETENTION_LIMIT=5
ERA_READER_ADAPTER_TYPE=**YOUR_ERA_READER_ADAPTER_TYPE**
ERA_READER_ADAPTER_PARAMS=**YOUR_ERA_READER_ADAPTER_PARAMS**
EOF'
Here is an example of the aforementioned command created with the example set for release-preprod:
sudo bash -c 'cat > /opt/mithril/mithril-signer.env << EOF
KES_SECRET_KEY_PATH=/cardano/keys/kes.skey
OPERATIONAL_CERTIFICATE_PATH=/cardano/keys/node.cert
NETWORK=preprod
AGGREGATOR_ENDPOINT=https://aggregator.release-preprod.api.mithril.network/aggregator
RUN_INTERVAL=60000
DB_DIRECTORY=/cardano/db
CARDANO_NODE_SOCKET_PATH=/cardano/ipc/node.socket
CARDANO_CLI_PATH=/app/bin/cardano-cli
DATA_STORES_DIRECTORY=/opt/mithril/stores
STORE_RETENTION_LIMIT=5
ERA_READER_ADAPTER_TYPE=cardano-chain
ERA_READER_ADAPTER_PARAMS={"address": "addr_test1qpkyv2ws0deszm67t840sdnruqgr492n80g3y96xw3p2ksk6suj5musy6w8lsg3yjd09cnpgctc2qh386rtxphxt248qr0npnx", "verification_key": "5b35352c3232382c3134342c38372c3133382c3133362c34382c382c31342c3138372c38352c3134382c39372c3233322c3235352c3232392c33382c3234342c3234372c3230342c3139382c31332c33312c3232322c32352c3136342c35322c3130322c39312c3132302c3230382c3134375d"}
EOF'
Then, create a /etc/systemd/system/mithril-signer.service description file for the service:
sudo bash -c 'cat > /etc/systemd/system/mithril-signer.service << EOF
[Unit]
Description=Mithril signer service
StartLimitIntervalSec=0

[Service]
Type=simple
Restart=always
RestartSec=60
User=cardano
EnvironmentFile=/opt/mithril/mithril-signer.env
ExecStart=/opt/mithril/mithril-signer -vvv

[Install]
WantedBy=multi-user.target
EOF'
Reload the service configuration (optional):
sudo systemctl daemon-reload
Then, start the service:
sudo systemctl start mithril-signer
Register the service to start on boot:
sudo systemctl enable mithril-signer
Monitor the status of the service:
systemctl status mithril-signer.service
Finally, monitor the logs of the service:
tail -f /var/log/syslog | grep mithril-signer
Activate a Prometheus endpoint
The Mithril signer node can expose basic metrics on a Prometheus endpoint, which is not activated by default.
| Metrics | Description |
|---|---|
| mithril_signer_signer_registration_success_since_startup | Number of successful signer registrations since startup on a Mithril signer node |
| mithril_signer_signer_registration_total_since_startup | Number of signer registrations since startup on a Mithril signer node |
| mithril_signer_signer_registration_success_last_epoch | Latest epoch at which signer successfully registered on a Mithril signer node |
| mithril_signer_signature_registration_success_since_startup | Number of successful signature registrations since startup on a Mithril signer node |
| mithril_signer_signature_registration_total_since_startup | Number of signature registrations since startup on a Mithril signer node |
| mithril_signer_signature_registration_success_last_epoch | Latest epoch at which signature successfully registered on a Mithril signer node |
| mithril_signer_runtime_cycle_success_since_startup | Number of successful runtime cycles since startup on a Mithril signer node |
| mithril_signer_runtime_cycle_total_since_startup | Number of runtime cycles since startup on a Mithril signer node |
To expose metrics on the endpoint, append the following environment variable to your environment file. In that case, the metrics server will listen on the 9090 port:
sudo bash -c 'cat >> /opt/mithril/mithril-signer.env << EOF
ENABLE_METRICS_SERVER=true
EOF`
You can also specify a custom listen IP address and port for the metrics server:
sudo bash -c 'cat >> /opt/mithril/mithril-signer.env << EOF
ENABLE_METRICS_SERVER=true
METRICS_SERVER_IP=**YOUR_METRICS_SERVER_IP**
METRICS_SERVER_PORT=**YOUR_METRICS_SERVER_PORT**
EOF`
Here is an example that reproduces the default configuration for the Prometheus server:
sudo bash -c 'cat >> /opt/mithril/mithril-signer.env << EOF
ENABLE_METRICS_SERVER=true
METRICS_SERVER_IP=0.0.0.0
METRICS_SERVER_PORT=9090
EOF`
When activated, the metrics endpoint will be accessible at the http://**YOUR_METRICS_SERVER_IP**:**YOUR_METRICS_SERVER_PORT**/metrics location, which translates to http://0.0.0.0:9090/metrics with the default configuration.
See this Grafana template, which helps to easily set up a dashboard for this Prometheus endpoint (ID 20776).
Rotating the KES keys
When the KES keys expire, the Mithril signer cannot register with the Mithril protocol.
After rotating the KES keys on your Cardano block producer, we recommend following this upgrade procedure for your Mithril signer node:
- Update the
KES_SECRET_KEY_PATHentry of your environment file to reflect the location of the new KES secret key file - Update the
OPERATIONAL_CERTIFICATE_PATHentry of your environment file to reflect the location of the new operational certificate file - Restart your Mithril signer service with the following command:
sudo systemctl restart mithril-signer
- Check the logs of your signer node and make sure that it has successfully registered after restarting (the following log should be displayed:
STATE MACHINE: new cycle: Registered).
Set up the Mithril relay node
-
For production deployment, the setup of the Mithril relay is performed on the Cardano relay machine
-
For naive deployment, this step is not necessary.
Building Squid from source
-
If you have already installed
Squidvia theaptpackage manager, we recommend that you delete it before manually building it from source by running the following commands:sudo systemctl stop squidsudo apt remove squidsudo apt autoremove
-
The FAQ for compiling
Squidis available here -
You will need a C++ compiler that can be installed with the
sudo apt install build-essentialcommand.
On the Squid page with released versions, identify the latest stable released version (currently 6.12) and download it:
wget https://www.squid-cache.org/Versions/v6/squid-6.12.tar.gz
Uncompress the downloaded archive and change the directory:
tar xzf squid-6.12.tar.gz
cd squid-6.12
Then, configure the compilation:
./configure \
    --prefix=/opt/squid \
    --localstatedir=/opt/squid/var \
    --libexecdir=/opt/squid/lib/squid \
    --datadir=/opt/squid/share/squid \
    --sysconfdir=/etc/squid \
    --with-default-user=squid \
    --with-logdir=/opt/squid/var/log/squid \
    --with-pidfile=/opt/squid/var/run/squid.pid
Compile the sources:
make
Install squid binary:
sudo make install
Optionally, verify that the version is correct:
/opt/squid/sbin/squid -v
You should see a result like this:
Squid Cache: Version 6.12
Service Name: squid
configure options:  '--prefix=/opt/squid' '--localstatedir=/opt/squid/var' '--libexecdir=/opt/squid/lib/squid' '--datadir=/opt/squid/share/squid' '--sysconfdir=/etc/squid' '--with-default-user=squid' '--with-logdir=/opt/squid/var/log/squid' '--with-pidfile=/opt/squid/var/run/squid.pid'
Configuring the Squid proxy
The Mithril relay node serves as a forward proxy, relaying traffic between the Mithril signer and the Mithril aggregator. When appropriately configured, it facilitates the security of the block-producing node. You can use squid to operate this forward proxy, and this section presents a recommended configuration.
Make a copy of the original configuration:
sudo cp /etc/squid/squid.conf /etc/squid/squid.conf.bak
Prepare the forward proxy configuration file:
sudo bash -c 'cat > /etc/squid/squid.conf << EOF
# Listening port (port 3132 is recommended)
http_port **YOUR_RELAY_LISTENING_PORT**

# ACL for the internal IP of your block producer node
acl block_producer_internal_ip src **YOUR_BLOCK_PRODUCER_INTERNAL_IP**

# ACL for aggregator endpoint
acl aggregator_domain dstdomain .mithril.network

# ACL for SSL port only
acl SSL_port port 443

# Allowed traffic
http_access allow block_producer_internal_ip aggregator_domain SSL_port

# Do not disclose block producer internal IP
forwarded_for delete

# Turn off via header
via off

# Deny request for original source of a request
follow_x_forwarded_for deny all

# Anonymize request headers
request_header_access Authorization allow all
request_header_access Proxy-Authorization allow all
request_header_access Cache-Control allow all
request_header_access Content-Length allow all
request_header_access Content-Type allow all
request_header_access Date allow all
request_header_access Host allow all
request_header_access If-Modified-Since allow all
request_header_access Pragma allow all
request_header_access Accept allow all
request_header_access Accept-Charset allow all
request_header_access Accept-Encoding allow all
request_header_access Accept-Language allow all
request_header_access Connection allow all
request_header_access All deny all

# Disable cache
cache deny all

# Deny everything else
http_access deny all

EOF'
Here is an example of the aforementioned command created with the example set for release-preprod:
sudo bash -c 'cat > /etc/squid/squid.conf << EOF
# Listening port (port 3132 is recommended)
http_port 3132

# ACL for the internal IP of your block producer node
acl block_producer_internal_ip src 192.168.1.75

# ACL for aggregator endpoint
acl aggregator_domain dstdomain .mithril.network

# ACL for SSL port only
acl SSL_port port 443

# Allowed traffic
http_access allow block_producer_internal_ip aggregator_domain SSL_port

# Do not disclose block producer internal IP
forwarded_for delete

# Turn off via header
via off

# Deny request for original source of a request
follow_x_forwarded_for deny all

# Anonymize request headers
request_header_access Authorization allow all
request_header_access Proxy-Authorization allow all
request_header_access Cache-Control allow all
request_header_access Content-Length allow all
request_header_access Content-Type allow all
request_header_access Date allow all
request_header_access Host allow all
request_header_access If-Modified-Since allow all
request_header_access Pragma allow all
request_header_access Accept allow all
request_header_access Accept-Charset allow all
request_header_access Accept-Encoding allow all
request_header_access Accept-Language allow all
request_header_access Connection allow all
request_header_access All deny all

# Disable cache
cache deny all

# Deny everything else
http_access deny all

EOF'
If you are using the same Cardano relay for multiple Cardano block producers, you will need to add a new line per block producer to authorize its internal IP:
# ACL for the internal IP of your block producer node
acl block_producer_internal_ip src **YOUR_BLOCK_PRODUCER_INTERNAL_IP_1**
acl block_producer_internal_ip src **YOUR_BLOCK_PRODUCER_INTERNAL_IP_2**
acl block_producer_internal_ip src **YOUR_BLOCK_PRODUCER_INTERNAL_IP_3**
With this configuration, the proxy will:
- Accept incoming traffic originating from the internal IP of the block-producing machine
- Accept incoming traffic directed to the listening port of the proxy
- Accept incoming HTTPS traffic proxied to
mithril.networkdomain hosts - Anonymize the traffic completely and avoid disclosing any information about the block-producing machine
- Deny all other traffic.
Installing the service
Create (or re-use) an unprivileged system user on the machine:
sudo adduser --system --no-create-home --group squid
Change ownership of /opt/squid/var directory:
sudo chown squid -R /opt/squid/var/
sudo chgrp squid -R /opt/squid/var/
Create a /etc/systemd/system/squid.service description file for the service:
sudo bash -c 'cat > /etc/systemd/system/squid.service << EOF
[Unit]
Description=Squid service
StartLimitIntervalSec=0

[Service]
Type=simple
Restart=always
RestartSec=60
User=squid
Group=squid
ExecStart=/opt/squid/sbin/squid -f /etc/squid/squid.conf -d5
PIDFile=/opt/squid/var/run/squid.pid

[Install]
WantedBy=multi-user.target
EOF'
Reload the service configuration (optional):
sudo systemctl daemon-reload
Then, start the service:
sudo systemctl start squid
Register the service to start on boot:
sudo systemctl enable squid
Monitor the status of the service:
systemctl status squid
Finally, monitor the logs of the service:
tail -f /var/log/syslog | grep squid
And monitor squid access logs:
sudo tail -f /opt/squid/var/log/squid/access.log
If your Squid service does not start properly and you have the error message FATAL: /dev/null (13) Permission denied in the logs of the service, it means that some permissions need to be fixed following the creation of the new squid user by running the following commands:
sudo chmod 666 /dev/nullsudo systemctl restart squid
Firewall configuration
We assume that the Cardano relay machine is protected by a firewall. Therefore, it is necessary to allow the proxied traffic originating from the Cardano block producer through this firewall.
About the Cardano relay machine
You need to allow incoming traffic on the listening port of the Mithril relay on the Cardano relay machine, originating from the Cardano block producer machine.
Assuming you are using Uncomplicated Firewall (0.36+), the command to open that traffic is:
sudo ufw allow from **YOUR_BLOCK_PRODUCER_INTERNAL_IP** to any port **YOUR_RELAY_LISTENING_PORT** proto tcp
Here is an example of the aforementioned command created with the example set for release-preprod:
sudo ufw allow from 192.168.1.75 to any port 3132 proto tcp
Assuming you are using Iptables (1.8.7+), the command to open that traffic is:
sudo iptables -A INPUT -s **YOUR_BLOCK_PRODUCER_INTERNAL_IP** -p tcp --dport **YOUR_RELAY_LISTENING_PORT** -j ACCEPT
sudo iptables -L -v
sudo service netfilter-persistent save
Here is an example of the aforementioned command created with the example set for release-preprod:
sudo iptables -A INPUT -s 192.168.1.75 -p tcp --dport 3132 -j ACCEPT
sudo iptables -L -v
sudo service netfilter-persistent save
Set up the DMQ node (unstable)
The DMQ node setup is currently unstable and not suitable for production use.
During the stabilization and ramp-up phase of the DMQ network:
- Signatures are still sent to the central aggregator (using the DMQ node is harmless)
- This section is subject to frequent changes.
The DMQ node supports the implementation of a Decentralized Message Queue (DMQ) for Mithril. The DMQ protocol allows Mithril signers to exchange signatures in a decentralized manner, enhancing the robustness and scalability of the Mithril networks. Once stabilized and deployed on a majority of SPOs on a Mithril network, the DMQ protocol will allow multiple aggregators to operate simultaneously, improving the overall availability of the Mithril protocol. The DMQ protocol is fully described in the CIP-0137.
The DMQ node follows the same deployment model as the Mithril signer node and the Cardano node:
- For production deployment, the DMQ node setup is performed on the Cardano block producer machine and on the Cardano relay machine
- For naive deployment, the DMQ node setup is performed on the Cardano relay machine only (for tests only).
If you choose the production deployment, you will need to install and configure the DMQ node on both the Cardano block producer machine and the Cardano relay machine, following the same steps.
- Here is the needed information to set up a DMQ node:
**YOUR_DMQ_NODE_SOCKET_PATH**: replace with the path to the IPC file of the DMQ node**YOUR_CARDANO_NODE_SOCKET_PATH**: replace with the path to the IPC file of the Cardano node**YOUR_CARDANO_NETWORK_MAGIC**: replace with the network magic number of your Cardano network**YOUR_DMQ_NODE_RELAY_INTERNAL_ADDRESS**: replace with the internal IP address of your DMQ node on the relay machine**YOUR_DMQ_NODE_RELAY_PUBLIC_ADDRESS**: replace with the public IP address of your DMQ node on the relay machine**YOUR_DMQ_NODE_RELAY_PORT**: replace with the listening port of your DMQ node on the relay machine**YOUR_DMQ_NODE_BLOCK_PRODUCER_INTERNAL_ADDRESS**: replace with the internal IP address of your DMQ node on the block producer machine (this is sensitive information that must not be shared publicly)**YOUR_DMQ_NODE_BLOCK_PRODUCER_PORT**: replace with the listening port of your DMQ node on the block producer machine**YOUR_DMQ_BOOTSTRAP_PEER_ADDRESS**: replace with the IP address of your DMQ bootstrap peer (the address can be found in the Mithril networks table)**YOUR_DMQ_BOOTSTRAP_PEER_PORT**: replace with the listening port of your DMQ bootstrap peer (the value can be found in the Mithril networks table).
Here is an example set of values for pre-release-preview that will be used in this guide in the tip boxes to illustrate some commands:
- YOUR_DMQ_NODE_SOCKET_PATH:
/dmq/ipc/node.socket - YOUR_CARDANO_NODE_SOCKET_PATH:
/cardano/ipc/node.socket - YOUR_CARDANO_NETWORK_MAGIC:
2 - YOUR_DMQ_NODE_RELAY_INTERNAL_ADDRESS:
192.168.1.30 - YOUR_DMQ_NODE_RELAY_PUBLIC_ADDRESS:
34.14.65.160 - YOUR_DMQ_NODE_RELAY_PORT:
6161 - YOUR_DMQ_NODE_BLOCK_PRODUCER_INTERNAL_ADDRESS:
192.168.1.60 - YOUR_DMQ_NODE_BLOCK_PRODUCER_PORT:
6161 - YOUR_DMQ_BOOTSTRAP_PEER_ADDRESS:
34.76.22.193 - YOUR_DMQ_BOOTSTRAP_PEER_PORT:
6161
Download the pre-built binary
As we are still in a testing stage, we only support the pre-release-preview network.
You can use these parameters for the pre-release-preview network:
- DMQ_RELEASE_URL:
https://github.com/IntersectMBO/dmq-node/releases/download/0.2.0.0-pre-7/dmq-node-linux.tar.gz
These URLs may change in the future; please refer to this page for the latest released version of the DMQ node binary.
To download the latest released version of the DMQ node binary, run the following command:
curl --fail -sL -o dmq-node.tar.gz **DMQ_RELEASE_URL**
Then, extract the archive:
tar -xzf dmq-node.tar.gz --strip-components=2 result/bin
And test that the binary works:
./dmq-node --version
You should see something like:
dmq-node version: 0.2.0.0
Installing the service
Move the executable
To move the executable to /opt/dmq, run:
sudo mkdir -p /opt/dmq
sudo mv dmq-node /opt/dmq
Prepare the configuration file of the DMQ node
- For a DMQ node on the relay machine, create a
/opt/dmq/config-relay.jsonconfiguration file:
bash -c 'cat > /opt/dmq/config-relay.json << EOF
{
  "CardanoNetworkMagic": **YOUR_CARDANO_NETWORK_MAGIC**,
  "CardanoNodeSocket": "**YOUR_CARDANO_NODE_SOCKET_PATH**"
  "PeerSharing": true,
  "LocalMsgSubmissionTracer": true,
  "LocalMsgNotificationTracer": true,
  "ConnectionManagerTracer": true,
  "DiffusionTracer": true,
  "InboundGovernorTracer": true,
  "LocalInboundGovernorTracer": true,
  "PeerSelectionTracer": true,
  "PeerSelectionCounters": true,
  "SigSubmissionLogicTracer": true,
  "SigSubmissionClientTracer": true,
  "SigSubmissionServerTracer": true,
  "SigSubmissionClientProtocolTracer": true,
  "SigSubmissionServerProtocolTracer": true,
  "MuxTracer": true,
  "ChannelTracer": false,
  "DebugPeerSelectionTracer": true,
  "ValidationTracer": true
}
EOF'
Here is an example of the aforementioned command created with the example set for pre-release-preview:
bash -c 'cat > /opt/dmq/config-relay.json << EOF
{
  "CardanoNetworkMagic": 2,
  "CardanoNodeSocket": "/cardano/ipc/node.socket"
  "PeerSharing": true,
  "LocalMsgSubmissionTracer": true,
  "LocalMsgNotificationTracer": true,
  "ConnectionManagerTracer": true,
  "DiffusionTracer": true,
  "InboundGovernorTracer": true,
  "LocalInboundGovernorTracer": true,
  "PeerSelectionTracer": true,
  "PeerSelectionCounters": true,
  "SigSubmissionLogicTracer": true,
  "SigSubmissionClientTracer": true,
  "SigSubmissionServerTracer": true,
  "SigSubmissionClientProtocolTracer": true,
  "SigSubmissionServerProtocolTracer": true,
  "MuxTracer": true,
  "ChannelTracer": false,
  "DebugPeerSelectionTracer": true,
  "ValidationTracer": true
}
EOF'
- For a DMQ node on the block-producer machine, create a
/opt/dmq/config-bp.jsonconfiguration file:
bash -c 'cat > /opt/dmq/config-bp.json << EOF
{
  "CardanoNetworkMagic": **YOUR_CARDANO_NETWORK_MAGIC**,
  "CardanoNodeSocket": "**YOUR_CARDANO_NODE_SOCKET_PATH**"
  "PeerSharing": false,
  "LocalMsgSubmissionTracer": true,
  "LocalMsgNotificationTracer": true,
  "ConnectionManagerTracer": true,
  "DiffusionTracer": true,
  "InboundGovernorTracer": true,
  "LocalInboundGovernorTracer": true,
  "PeerSelectionTracer": true,
  "PeerSelectionCounters": true,
  "SigSubmissionLogicTracer": true,
  "SigSubmissionClientTracer": true,
  "SigSubmissionServerTracer": true,
  "SigSubmissionClientProtocolTracer": true,
  "SigSubmissionServerProtocolTracer": true,
  "MuxTracer": true,
  "ChannelTracer": false,
  "DebugPeerSelectionTracer": true,
  "ValidationTracer": true
}
EOF'
Here is an example of the aforementioned command created with the example set for pre-release-preview:
bash -c 'cat > /opt/dmq/config-bp.json << EOF
{
  "CardanoNetworkMagic": 2,
  "CardanoNodeSocket": "/cardano/ipc/node.socket"
  "PeerSharing": false,
  "LocalMsgSubmissionTracer": true,
  "LocalMsgNotificationTracer": true,
  "ConnectionManagerTracer": true,
  "DiffusionTracer": true,
  "InboundGovernorTracer": true,
  "LocalInboundGovernorTracer": true,
  "PeerSelectionTracer": true,
  "PeerSelectionCounters": true,
  "SigSubmissionLogicTracer": true,
  "SigSubmissionClientTracer": true,
  "SigSubmissionServerTracer": true,
  "SigSubmissionClientProtocolTracer": true,
  "SigSubmissionServerProtocolTracer": true,
  "MuxTracer": true,
  "ChannelTracer": false,
  "DebugPeerSelectionTracer": true,
  "ValidationTracer": true
}
EOF'
Prepare the topology file for the DMQ node
The DMQ node's topology file follows a similar format to the Cardano node's topology file. More information is available at Cardano node topology.
- For a DMQ node on the relay machine, create a
/opt/dmq/topology-relay.jsonconfiguration file:
bash -c 'cat > /opt/dmq/topology-relay.json << EOF
{
  "bootstrapPeers": [],
  "localRoots": [
    {
      "accessPoints": [
        {
          "address": "**YOUR_DMQ_BOOTSTRAP_PEER_ADDRESS**",
          "port": **YOUR_DMQ_BOOTSTRAP_PEER_PORT**,
          "valency": 1
        }
      ],
      "advertise": true,
      "trustable": false,
      "valency": 2
    }
  ],
  "peerSnapshotFile": null,
  "publicRoots": [
    {
      "accessPoints": [],
      "advertise": false
    }
  ]
}
EOF'
Here is an example of the aforementioned command created with the example set for pre-release-preview:
bash -c 'cat > /opt/dmq/topology-relay.json << EOF
{
  "bootstrapPeers": [],
  "localRoots": [
    {
      "accessPoints": [
        {
          "address": "34.76.22.193",
          "port": 6161,
          "valency": 1
        }
      ],
      "advertise": true,
      "trustable": false,
      "valency": 2
    }
  ],
  "peerSnapshotFile": null,
  "publicRoots": [
    {
      "accessPoints": [],
      "advertise": false
    }
  ]
}
EOF'
- For a DMQ node on the block-producer machine, create a
/opt/dmq/topology-bp.jsonconfiguration file:
bash -c 'cat > /opt/dmq/topology-bp.json << EOF
{
  "bootstrapPeers": [],
  "localRoots": [
    {
      "accessPoints": [
        {
          "address": "**YOUR_DMQ_NODE_RELAY_INTERNAL_ADDRESS**",
          "port": **YOUR_DMQ_NODE_RELAY_PORT**,
          "valency": 1
        }
      ],
      "advertise": false,
      "trustable": false,
      "valency": 2
    }
  ],
  "peerSnapshotFile": null,
  "publicRoots": [
    {
      "accessPoints": [],
      "advertise": false
    }
  ]
}
EOF'
Here is an example of the aforementioned command created with the example set for pre-release-preview:
bash -c 'cat > /opt/dmq/topology-bp.json << EOF
{
  "bootstrapPeers": [],
  "localRoots": [
    {
      "accessPoints": [
        {
          "address": "192.168.1.30",
          "port": 6161,
          "valency": 1
        }
      ],
      "advertise": false,
      "trustable": false,
      "valency": 2
    }
  ],
  "peerSnapshotFile": null,
  "publicRoots": [
    {
      "accessPoints": [],
      "advertise": false
    }
  ]
}
EOF'
Set up the service
User=cardano: Replace this value with the correct user. We assume that the user running the Cardano node iscardano. The DMQ node must imperatively run with the same user.
- For a DMQ node on the relay machine, create a
/etc/systemd/system/dmq-relay.servicedescription file for the service:
sudo bash -c 'cat > /etc/systemd/system/dmq-relay.service << EOF
[Unit]
Description=DMQ relay service
StartLimitIntervalSec=0

[Service]
Type=simple
Restart=always
RestartSec=60
User=cardano
ExecStart=/opt/dmq/dmq-node --configuration-file /opt/dmq/config-relay.json --topology-file /opt/dmq/topology-relay.json --local-socket **YOUR_DMQ_NODE_SOCKET_PATH** --host-addr **YOUR_DMQ_NODE_RELAY_PUBLIC_ADDRESS** --port **YOUR_DMQ_NODE_RELAY_PORT**

[Install]
WantedBy=multi-user.target
EOF'
Here is an example of the aforementioned command created with the example set for pre-release-preview:
sudo bash -c 'cat > /etc/systemd/system/dmq-relay.service << EOF
[Unit]
Description=DMQ relay service
StartLimitIntervalSec=0

[Service]
Type=simple
Restart=always
RestartSec=60
User=cardano
ExecStart=/opt/dmq/dmq-node --configuration-file /opt/dmq/config-relay.json --topology-file /opt/dmq/topology-relay.json --local-socket /dmq/ipc/node.socket --host-addr 34.14.65.160 --port 6161

[Install]
WantedBy=multi-user.target
EOF'
Reload the service configuration (optional):
sudo systemctl daemon-reload
Then, start the service:
sudo systemctl start dmq-relay
Register the service to start on boot:
sudo systemctl enable dmq-relay
Monitor the status of the service:
systemctl status dmq-relay.service
Finally, monitor the logs of the service:
tail -f /var/log/syslog | grep dmq-relay
- For a DMQ node on the block-producer machine, create a
/etc/systemd/system/dmq-bp.servicedescription file for the service:
sudo bash -c 'cat > /etc/systemd/system/dmq-bp.service << EOF
[Unit]
Description=DMQ block-producer service
StartLimitIntervalSec=0

[Service]
Type=simple
Restart=always
RestartSec=60
User=cardano
ExecStart=/opt/dmq/dmq-node --configuration-file /opt/dmq/config-bp.json --topology-file /opt/dmq/topology-bp.json --local-socket **YOUR_DMQ_NODE_SOCKET_PATH** --host-addr **YOUR_DMQ_NODE_BLOCK_PRODUCER_INTERNAL_ADDRESS** --port **YOUR_DMQ_NODE_BLOCK_PRODUCER_PORT**

[Install]
WantedBy=multi-user.target
EOF'
Here is an example of the aforementioned command created with the example set for pre-release-preview:
sudo bash -c 'cat > /etc/systemd/system/dmq-bp.service << EOF
[Unit]
Description=DMQ block-producer service
StartLimitIntervalSec=0

[Service]
Type=simple
Restart=always
RestartSec=60
User=cardano
ExecStart=/opt/dmq/dmq-node --configuration-file /opt/dmq/config-bp.json --topology-file /opt/dmq/topology-bp.json --local-socket /dmq/ipc/node.socket --host-addr 192.168.1.60 --port 6161

[Install]
WantedBy=multi-user.target
EOF'
Reload the service configuration (optional):
sudo systemctl daemon-reload
Then, start the service:
sudo systemctl start dmq-bp
Register the service to start on boot:
sudo systemctl enable dmq-bp
Monitor the status of the service:
systemctl status dmq-bp.service
Finally, monitor the logs of the service:
tail -f /var/log/syslog | grep dmq-bp
Update the configuration of the Mithril signer
The Mithril signer node must be configured to use the DMQ node (use the block-producer DMQ node socket path for the production deployment):
sudo bash -c 'cat >> /opt/mithril/mithril-signer.env << EOF
DMQ_NODE_SOCKET_PATH=**YOUR_DMQ_NODE_SOCKET_PATH**
EOF'
Here is an example of the aforementioned command created with the example set for pre-release-preview:
sudo bash -c 'cat >> /opt/mithril/mithril-signer.env << EOF
DMQ_NODE_SOCKET_PATH=/dmq/ipc/node.socket
EOF'
Firewall configuration
You should use a configuration that is very similar to your Cardano nodes' configuration:
- For the DMQ node on the relay machine, allow incoming traffic on the listening port of your DMQ relay node from the Cardano block producer machine
- For the DMQ node on the block-producer machine, allow incoming traffic on the listening port of your DMQ block-producer node from the DMQ relay machine only.
More information about the recommended firewall configuration of the Cardano node is available at Cardano firewall configuration.
Verify the Mithril signer deployment
There is a delay of 2 epochs between the signer node's registration and its ability to generate individual signatures. This delay is further explained in the Mithril certificate chain in depth documentation.
Once this delay has passed, you should be able to observe your PoolId listed in some of the certificates accessible on the Mithril explorer.
Verify your signer is registered
After installing the Mithril signer, you can verify that your node is registered.
First, download the script into the desired directory:
wget https://mithril.network/doc/scripts/verify_signer_registration.sh
Make the script executable:
chmod +x verify_signer_registration.sh
Finally, execute the script:
PARTY_ID=**YOUR_PARTY_ID** AGGREGATOR_ENDPOINT=**YOUR_AGGREGATOR_ENDPOINT** ./verify_signer_registration.sh
Here is an example command:
PARTY_ID=pool1hp72sauk0g0yqm4dzllz0pz6j93gewhllkzphn4hykkfmne43y AGGREGATOR_ENDPOINT=https://aggregator.release-preprod.api.mithril.network/aggregator ./verify_signer_registration.sh
If your signer is registered, you should see this message:
>> Congrats, your signer node is registered!
Otherwise, you should see this error message:
>> Oops, your signer node is not registered. Party ID not found among the signers registered at epoch 430.
Verify your signer contributes with individual signatures
After waiting for two epochs, you will be able to verify that your signer is contributing with individual signatures.
First, download the script into the desired directory:
wget https://mithril.network/doc/scripts/verify_signer_signature.sh
Make the script executable:
chmod +x verify_signer_signature.sh
Finally, execute the script:
PARTY_ID=**YOUR_PARTY_ID** AGGREGATOR_ENDPOINT=**YOUR_AGGREGATOR_ENDPOINT** ./verify_signer_signature.sh
Here is an example of the aforementioned command created with the example set for release-preprod:
PARTY_ID=pool1hp72sauk0g0yqm4dzllz0pz6j93gewhllkzphn4hykkfmne43y AGGREGATOR_ENDPOINT=https://aggregator.release-preprod.api.mithril.network/aggregator ./verify_signer_signature.sh
If your signer is contributing, you should see this message:
>> Congrats, you have signed this certificate: https://aggregator.release-preprod.api.mithril.network/aggregator/certificate/el3p289b03a223244285b2ls10839846ae7a69f1e8362824a383f376f93f723f !
Otherwise, you should see this error message:
>> Oops, your party id was not found in the last 20 certificates. Please try again later.